








19 Low-Maintenance Pixie Cuts for Women Over 60 With Glasses
From a soft side-swept fringe that stops above your frames to a tapered nape you can towel-dry, these short cuts work with glasses.
By Nora Bennett, Style Editor
Updated · 19 min read
- Written by our style editor
- How we review

Your glasses rest on three points: the bridge of your nose and the top of each ear. A pixie meets your frames in two places, the fringe at the top of the lenses and the sides where the arms rest on your ears.
Get either one wrong and you'll know by lunch. Hair packed under a temple arm tilts the lenses. A fringe that lands on the rim gets pushed aside fifty times a day.
Get both right, and short hair with glasses is about the easiest arrangement you'll ever have. Most good pixies need a trim every four to eight weeks, a little cream and your fingers.
19A Classic Tapered Pixie With a Short Nape

This is the pixie most people picture. It's about two inches on top, the sides are cut close above the ear, and the back tapers down until it nearly disappears into your neck.
It suits an oval or heart-shaped face and fine to medium hair that lies fairly straight.
With glasses, it simply gets out of the way. Nothing sits under the temple arms, so the frames rest level on your ears. Thin wire and rimless styles look crisp against it instead of competing with it.
Mornings are short. Towel-dry, rub a pea-sized dab of light cream between your palms, and push the top forward or to the side with your fingers. Three minutes, if that.
Book a trim every four to five weeks. The taper is what keeps the cut neat, and it's the first part to go fuzzy.
Say this in the chair: "A tapered pixie, two inches on top, scissor-cut sides above the ear, nape tapered close."
Skip it if you count on your hair to soften a square jaw. This cut shows the whole outline of your face, and it doesn't hide anything.
18A Side-Swept Pixie With a Long Fringe

The sides and back stay short, but the fringe is left long and brushed across to one side, ending near the outer corner of your frames. It's a good choice for a round face or a high forehead, because the diagonal line breaks up both.
The fringe is the part to get right. On the long side it should finish at your brow bone, just above the rim, never resting on it. If it lands on the lens, you'll spend the day pushing it away.
Ask the stylist to take some weight out of the fringe, so a thin, soft edge meets the frame instead of a heavy one.
Styling needs one tool. Blow-dry the fringe for about a minute with a flat brush in the direction of the sweep, and let the rest air-dry.
Clear acetate and pale tortoiseshell frames suit it, since they let the fringe show through just above the lens line.
The fringe outgrows the rest of the cut first, usually around week three. Ask whether your salon does fringe tidies between appointments. Many do, and the policies on cost vary, so check before you go in.
17A Textured Crop With a Choppy Top
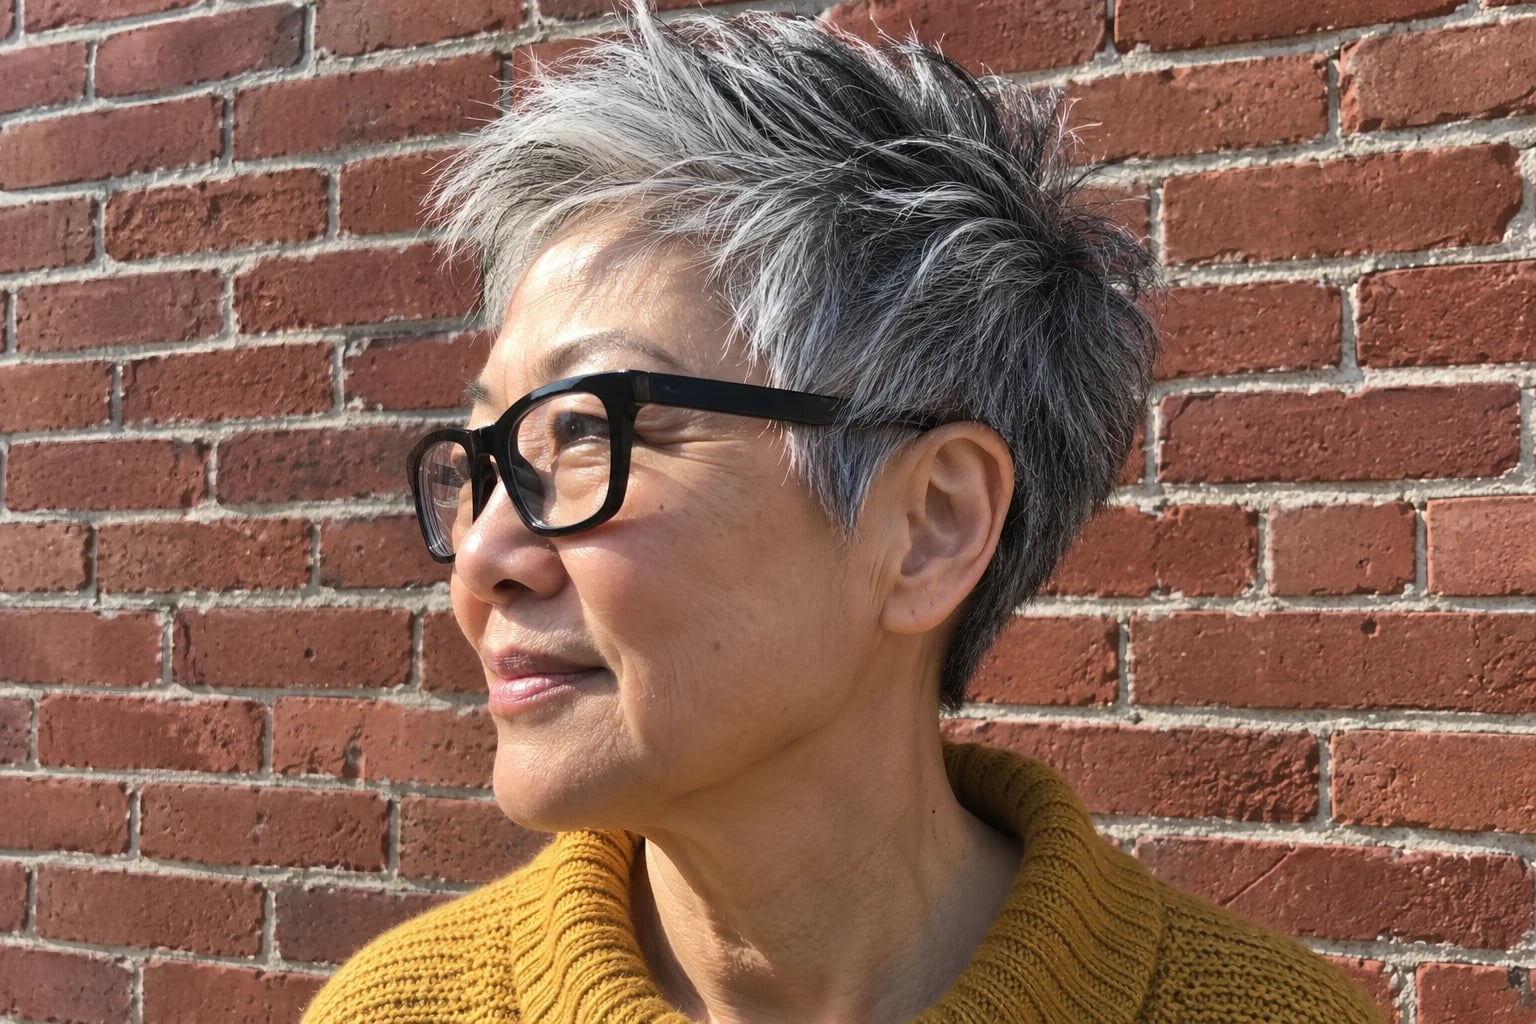
Look at the top: two to three inches of hair cut so the ends are deliberately uneven, standing up in separate pieces. The sides are short and the nape is tight.
It suits thick or coarse hair, and it holds its own beside heavy frames like thick black rectangles.
The choppiness is the low-maintenance trick. Stylists get it by point cutting, snipping into the ends vertically rather than straight across. With no clean line to lose, growth doesn't show for a while, and you can often stretch trims to six weeks.
Your routine: let it air-dry, then warm a little paste or wax between your fingertips and scrunch it through the top. Rough is the point. Two minutes, start to finish.
What to say: "Point-cut the top, keep it piecey, take the bulk out at the sides."
That last part matters with glasses. Thick hair packed under the temple arms can lift your frames on one side, so you look slightly tilted in every photo.
Skip this one if your hair is very fine. The separation that looks deliberate on thick hair can look sparse on fine hair.
16A Pixie Cut Clean Above the Ears
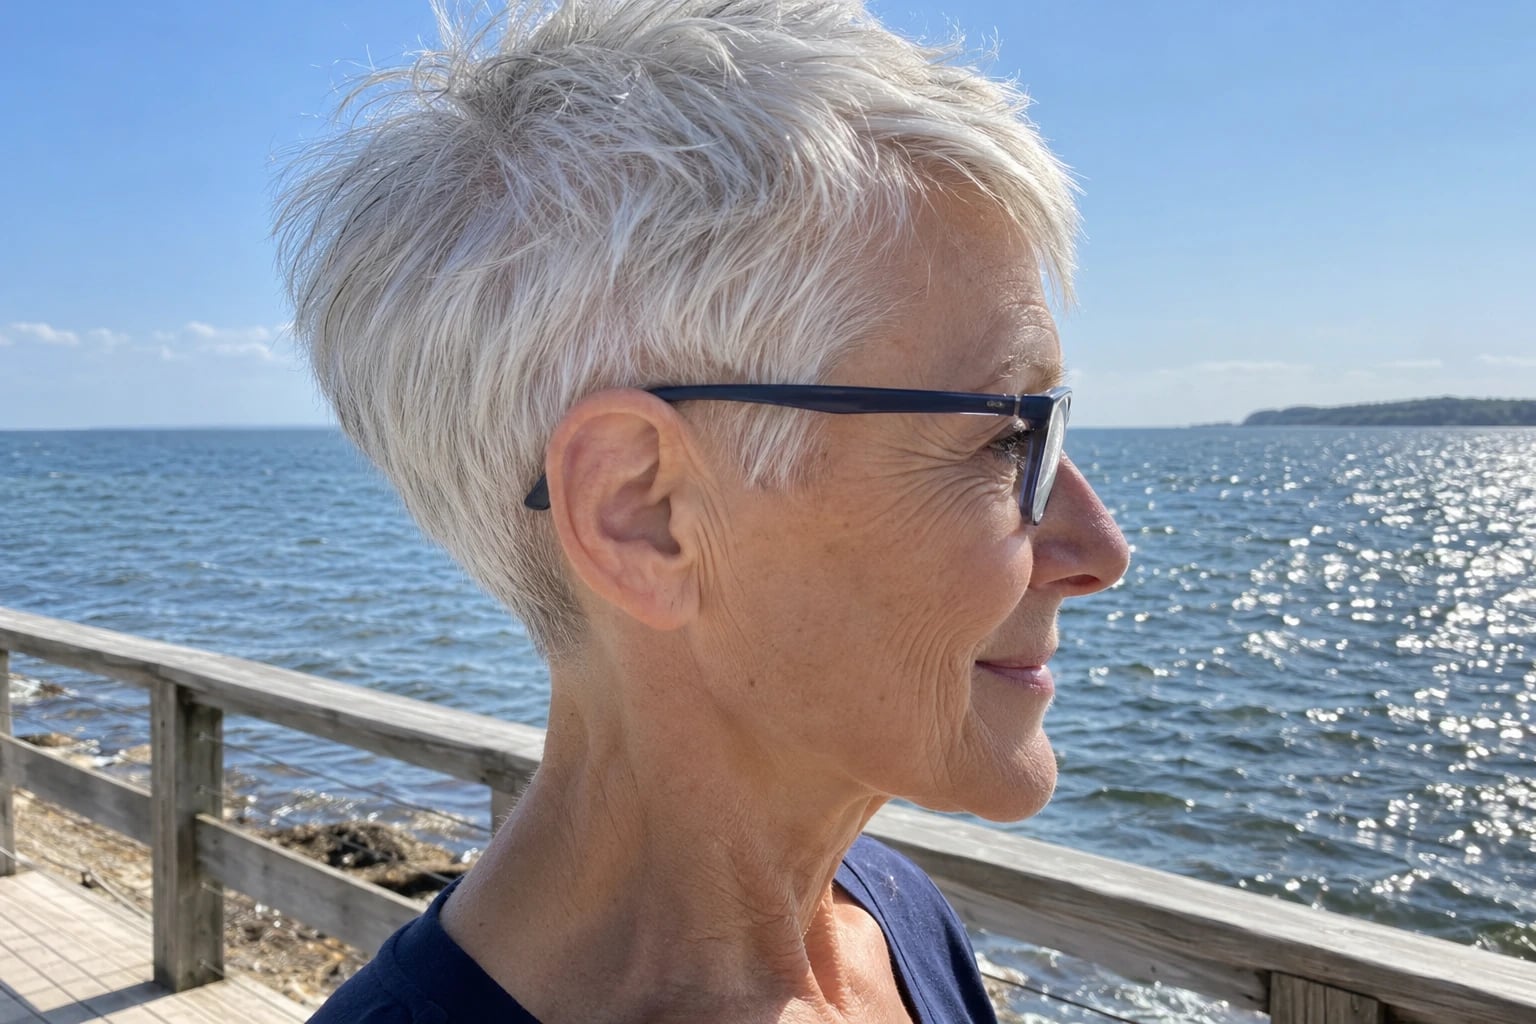
The detail to notice is the ear line. The hair is traced around each ear in a smooth curve, so the whole ear shows and nothing touches it. Top length can vary; the clean edge is what makes this cut.
For glasses, it's the tidiest fit there is. The temple arm sits straight on the ear with no hair underneath, so your frames don't tilt and no stray pieces poke out over the arm.
If your frames are heavy or already feel snug, this takes the extra bulk of hair out of the equation.
It also shows off earrings, which is worth weighing if you wear them most days.
To ask for it: "A clean ear line, cut around the ear, not over it, with the sideburn trimmed short."
Here's the honest trade. A sharp outline blurs sooner than a soft one, often by week three or four, so you'll be back at the salon more often than with most pixies.
If hair bunched under your glasses has bothered you for years, it's worth the extra visits.
Daily styling barely registers: a little cream through the top, and comb the sides flat.
15A Long Pixie With Wisps at the Nape

This is the gentlest way into short hair. The top is three to four inches, the sides fall softly over the top of the ear, and the nape is left in loose wisps rather than clipped.
It suits a long neck, and anyone who isn't sure she's ready to go all the way short.
Glasses need one adjustment here. Because the sides cover part of the ear, the temple arm slides under the hair.
Ask the stylist to thin the hair just above the ear where the arm sits, so it lies flat over the frame instead of puffing out.
With that done, square tortoiseshell or other mid-weight frames sit neatly beneath it.
The length is forgiving. Trims every six to eight weeks keep it in shape, and it grows slowly enough that nobody notices week five.
Mornings: a small handful of light mousse through damp hair, a scrunch, then air-dry. Five minutes or less.
The words: "A long pixie, about four inches on top, sides over the ear but thinned where my glasses sit, and a wispy nape."
See more: 26 Stunning Long Hairstyles for Women Over 50 to Try in 2026 →
14A Curly Pixie, Shorter at the Sides
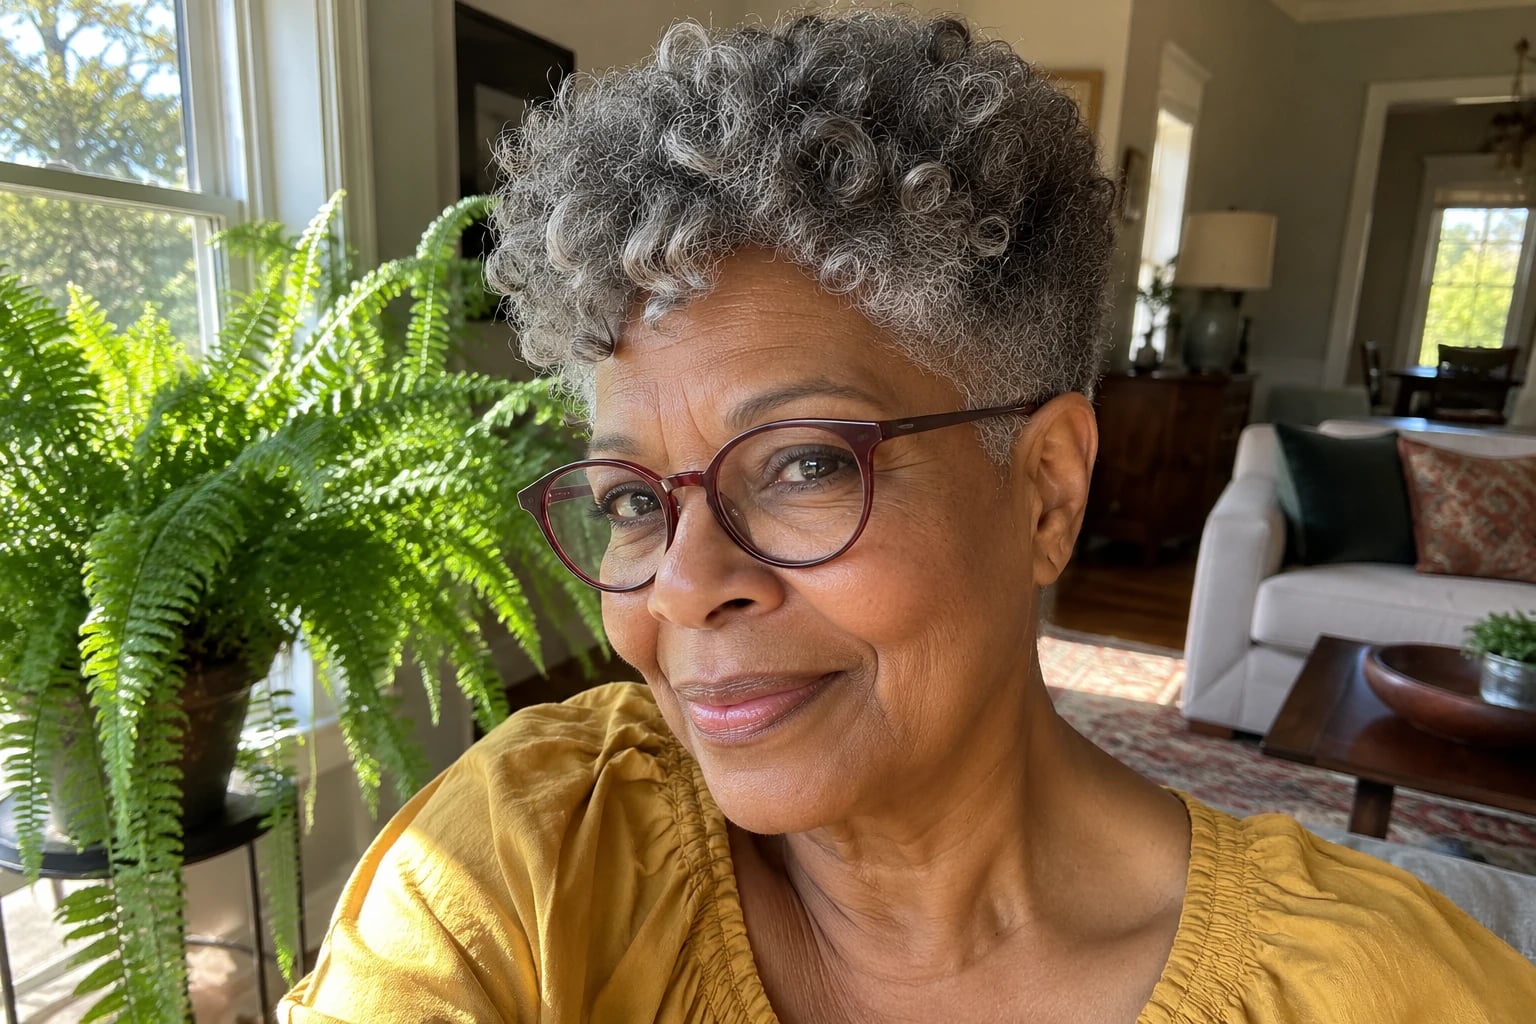
Curls are kept on top, two to three inches when stretched out, while the sides and back are cut close. You get a soft crown of curl over a neat outline.
It suits naturally curly and coily hair, the kind that's been fighting a flat iron for decades.
Short sides are what make it work with glasses. Curls at the temple like to spring out over the frame arms, and keeping them close stops that.
The top curls sit above the frames, so a round or brightly colored frame looks set off rather than buried.
How it's cut matters more than the length. Curls shrink as they dry, sometimes a lot, so ask for it cut dry, curl by curl, or at least finished dry.
"Cut my curls dry, keep the length on top, take the sides short" covers it.
Styling: wet hair, a leave-in conditioner or curl cream raked through, a scrunch, then hands off until it's dry. Touching it while it's damp is what brings the frizz.
Trims run every six to eight weeks. Find a stylist who cuts curly hair every week, not now and then, and ask to see examples before you book.
13A Feathered Pixie With a Swept-Back Crown

Picture the 1970s feathered cut, shrunk down. The layers at the sides are cut at an angle so they fall back from the face, and the crown is brushed up and back.
It suits fine to medium hair with a slight wave, and anyone who wore feathered hair the first time around.
That backward sweep at the temples is good news for glasses, because the hair moves away from the frame arms instead of toward them. It's lovely with cat-eye frames, whose upswept outer corners follow the same direction as the hair.
Ask for "layers angled back, away from my face at the sides, with lift at the crown."
Some stylists cut this with a razor for softer, feathery ends. If yours reaches for one, that's a normal choice for this shape.
Styling is either three minutes with a round brush, rolling the sides back, or finger-drying everything backward on low heat. The finger version looks softer and takes less practice.
Plan on trims every five to six weeks. Once the layers lengthen, they flop forward instead of back, and the sweep is gone.
12An Asymmetrical Pixie With One Longer Side

One side is cropped above the ear. The other is left longer, swinging forward toward the cheekbone.
It's a cut with some attitude, and it suits a woman who wears bright red or cobalt frames and likes being noticed in them.
With glasses, the long side needs the most care. It should end level with or behind the frame, never hanging over the lens. The temple arm on that side sits under the longer hair, so ask for it thinned there to keep the frames level.
The short side gives you one clean view of your frames, which is half the appeal.
Say: "Asymmetric pixie, short side above the ear, long side ending at the cheekbone and behind my frames."
Styling takes a little more than most. Give the long side two minutes with a dryer and a brush so it swings in one direction.
The honest part: this cut asks the most of you. It grows out unevenly, and by week five the long side can start looking like a mistake. Keep trims to every four to six weeks, or pick a softer cut.
11An Undercut Pixie With a Clipped Nape

From the outside, it looks like a soft pixie with a longer top. Lift that top layer, though, and the hair underneath at the nape and above the ears is clipped very short.
It suits thick or very dense hair, which can otherwise turn a pixie into a helmet.
That hidden short layer is what helps your glasses. The hair directly under the temple arms is barely there, so the frames sit flat while the longer top falls over and hides the clipped part.
Ask for it plainly: "An undercut at the nape and above the ears, clipper guard number two or three, with the top long enough to cover it."
A number two guard leaves about a quarter inch. A number three leaves about three-eighths.
Day to day, it's close to nothing. Towel-dry and comb the top into place. Air-drying is fine.
The clipped section grows out first, usually looking fuzzy by week three or four. Many salons offer a quick neck tidy between full cuts; ask what yours charges before you assume it's included.
10A Wavy Pixie Left to Air-Dry

This cut keeps the wave you have instead of fighting it. There's three inches or so on top, the sides are a little longer than a classic pixie, and each section is cut so the bend falls where it wants to.
It suits wavy hair, and anyone who'd happily never hold a hair dryer again.
The glasses issue is waves at the temple, which can bunch up against the frame arms. Ask for the sides cut so the wave bends back behind the ear. Rimless and thin metal frames look good here, leaving the texture as the main event.
What to say: "I want to air-dry this. Cut it to my wave, and please don't thin the wave out." Heavy thinning can break up a wave pattern and leave frizz behind.
Styling: scrunch a light mousse or texture spray through damp hair, then leave it alone. Give it about 20 minutes and it settles by itself.
Trims every six weeks or so. Wave hides growth well, so a week late won't show.
Day-two hair often looks better than day one. On day three, a spritz of water and a scrunch wakes it back up.
See more: 20 Best Shampoos for Women Over 60 With Thinning Hair →
9A Short Pixie With a Micro Fringe

The fringe is the whole story: very short, about an inch, sitting well above the brows, either straight or softly choppy. The rest of the pixie stays short.
It suits an oval face and bold frames, and it's a confident look.
With glasses, it's simple. The fringe never comes near the rim, and the band of forehead between the two makes your frames the feature. Thick green or black acetate looks deliberate here. Very fine frames can look lost.
Ask for "a micro fringe, about an inch, textured rather than blunt." Textured edges grow out softer.
Mornings: wet the fringe, smooth it down with your fingers, and let it dry flat. Two minutes.
Who should skip it: anyone with a strong cowlick at the front hairline. A fringe this short has no weight to hold it down, and you'll have a tuft standing up every morning. Check your hairline wet, before you commit.
The upkeep is real. A micro fringe looks grown-out within about three weeks, so expect fringe tidies or frequent full cuts. If you won't keep those up, choose a longer fringe.
8A Pixie Brushed Forward Into a Straight Fringe

All the hair is combed forward from the crown, and the fringe is cut almost straight across at about brow level.
It suits a long face or a high forehead, since the fringe shortens both.
Fringe length is the glasses question. Ask for it to finish a finger's width above the top of your frames, so it never rests on the rim.
Thin metal ovals and rimless styles work best with it. Browline frames, the kind with a heavy top bar, tend to crowd the fringe and look cramped.
This is about as fast as a cut gets. Towel-dry, comb everything forward and leave it. The cut does the shaping, so two minutes is plenty.
The wording: "Pixie brushed forward, fringe cut straight across a finger's width above my frames, sides short."
Trims every five weeks or so keep the fringe from sliding toward your lenses.
Fine and medium straight hair suit it best. Very curly hair won't lie forward in one direction, so pick a cut that works with your curl instead.
7A Deep Side-Part Pixie With Lift at the Crown

The part sits far over, about in line with the outer corner of your eye, and the top sweeps across from it with height at the crown.
It suits a round face and fine hair, since height on top lengthens the face and makes fine hair look like more.
That diagonal sweep moves hair away from one lens entirely. On the part side, the shorter hair tucks behind the ear, and the frame arm sits on it cleanly. Rose-gold or thin metal frames suit the soft line of it.
Ask: "Deep side part, layers at the crown for height, keep the weight on the heavy side."
Tell the stylist which way your hair naturally falls, so the part goes there and doesn't fight a cowlick.
Mornings take a dryer, but not for long. Lift the crown with your fingers while you dry it for a couple of minutes, then smooth the sweep over. About four minutes in all.
Trims every five to six weeks. When the crown layers grow, they flatten, and the height is the first thing you lose.
6A Fine-Hair Pixie With Point-Cut Layers

Short layers are cut into the top, about two inches long, with the ends snipped into points rather than chopped straight. The ends lift and separate, so fine hair looks fuller than it does hanging at one length.
It suits fine hair, and hair that's grown finer than it used to be.
Glasses help this cut, oddly. Fine hair that falls over the frame arms tends to flatten and split around them, and short sides avoid that.
The frames also give your face a defined line that fine hair can't always give alone. Half-rim frames look neat with it.
The wording: "Short point-cut layers on top, please don't thin it much, and keep the sides above my frames." Heavy thinning shears take out hair you don't have to spare.
Some stylists prefer scissors to a razor on fine hair, because razored ends can look wispy and see-through. Ask which they plan to use.
Styling: a little volumizing mousse at the roots, then rough-dry with your fingers for two or three minutes, lifting at the crown.
Trims every five weeks or so, since the layers lose their lift as they grow.
See more: 25 Bob Hairstyles for Women Over 60 With Thin Hair →
5A Soft Shaggy Pixie With Wispy Edges

Layers all over, a wispy fringe, and feathery pieces around the hairline and down the neck. It's a pixie that looks a little undone on purpose.
It suits medium-textured hair, heart-shaped and long faces, and anyone who likes her hair looking slightly slept on.
The wisps at the temple sit softly in front of the frame arms, which blurs the line where glasses meet hair. Oversized tortoiseshell looks especially good here.
Ask the stylist to keep the fringe wisps out of the lens line, though, or they'll tickle the top of your frames all day.
"A shaggy pixie with lots of layers, wispy around the hairline, fringe stopping above my frames." That's your request.
It's the easiest one here to wear. Air-dry, scrunch in a bit of texture spray, and go. Day two looks better than day one.
It's also the most forgiving to grow out. Trims every six to eight weeks are plenty, and a late appointment just makes it shaggier. If you're likely to skip a trim now and then, this is your cut.
4A Swept-Back Pixie With a Lifted Front

The front is left longer, three to four inches, and brushed up and back off the forehead. The sides and back are short. Your whole face shows, and so do your frames.
It's the cut for someone who wants nothing near her lenses, ever. No fringe touches the top of the frames, and the short sides leave the arms clear.
Heavy black browline frames, the 1950s kind with a thick top bar, look sharp against it.
Who should skip it: if your face is long, lift at the front adds more length. A side-swept or forward fringe would balance you better.
Styling takes a little more effort than an air-dry cut. Blow-dry the front back with a vent brush for about two minutes, or comb a small amount of gel through damp hair and let it set. The gel route is quicker.
Ask for "a long front, swept back, short tapered sides, with weight left at the front so it holds lift."
Trims every five to six weeks keep the sides short enough that the front looks lifted rather than heavy.
3A Pixie With Long Tapered Sideburns

At each side, a longer piece of hair is left in front of the ear and tapered down to a point, past the spot where the frame arm crosses. The rest is a standard short pixie.
It softens an angular face and draws a fine line down the cheek.
This is the cut that works with your glasses rather than around them. The sideburn sits in front of the temple arm, outlining the frame instead of getting trapped beneath it. Narrow wire rectangles look precise next to it.
Ask: "Taper the sideburns to a point, long enough to sit in front of my frame arms, and keep the hair behind them short."
Mornings: smooth a tiny bit of cream onto the sideburns, pressing them forward toward your face, then finger the top into place. Three minutes.
The points lose their shape first, often by week four or five, so trim every five weeks or so.
It's subtle in a photo and noticeable in person, especially in profile, where the point and the frame arm line up.
2A Pixie With a Center-Parted Curtain Fringe

The fringe parts in the middle and curves out to either side, sweeping over the brows toward the temples, the way 1970s curtain bangs did. The top is about three inches and the sides are soft.
It suits long and oval faces, and frames that are round or aviator-shaped.
With glasses, the shape follows the frames. The part opens above the bridge, and each side arcs over the top of a lens to the temple, so it frames your glasses rather than covering them.
The ends should land above or just behind the temple arm, not on it.
Say: "Curtain fringe, shortest at the center, longest at the temples, nothing below my brows."
Styling takes the dryer for about a minute. Push each side out and away with your fingers as it dries. Air-dried, it falls a little straighter, which looks fine too.
Trims every six weeks. The curtain grows into the lenses before anything else does, so when it touches the frames, it's time.
1A Glasses-Fitted Pixie With Thinned Temples

This one looks like a soft, everyday pixie, and that's on purpose. The fringe ends a finger's width above the top of the frames. The hair above and behind the ears is thinned right where the temple arms sit. The nape is tapered short.
It suits almost every woman who wears glasses from morning to night.
It's the most useful because it's built around your frames. Each part solves a glasses problem: the fringe stays off the rim, the thinned sides let the arms lie flat, and the short nape stays neat however you sit.
Here's how to ask. Sit in the chair with your glasses on and say: "I wear these all day. Please set the fringe a finger's width above the frames, take the bulk out where the arms sit, and taper the nape."
Expect the stylist to cut the sides with your frames off, then check them with your frames back on.
Styling: towel-dry, a dab of cream, fingers through the top. Three minutes, and the rest air-dries.
Trims every five to six weeks keep the fringe clear of the rims.
At home, take your glasses off and put them back on a few times. If they settle in the same spot each time, with no hair caught under the arms, the cut is right.
The bottom line
If you book one cut first, make it the glasses-fitted pixie. Once the fringe sits clear of your frames and the sides lie flat under the arms, you can add a sweep, a curtain or a choppy top at a later visit.
This week, call your salon and book a full cut appointment rather than a quick trim, so there's time to fit it to your frames.
Up next
23 Short Gray Hairstyles for Women Over 60
A visual guide to short gray hairstyles for women over 60, from pixies to wedges, with mirror checks for face shape, hair texture, and morning effort.
Read the list →

Reader quiz
Did you catch the details?
3 questions from this article. Finish them all to unlock the editor's bonus tip.
How does the article suggest checking at home that the glasses-fitted pixie was cut right?
Did any of these feel familiar?
Know someone who needs this?
Nora Bennett
Style Editor
Nora writes about hair, clothes and grooming for people who have stopped asking permission: what to keep, what to let go, and what reads as taken care of.
More from Nora Bennett